

Introduction
Setting up a web server on a local network and making it publicly accessible is typically a security nightmare. Traditionally, you’d have to:
- Open ports on your router (risky)
- Expose your server’s public IP
- Deal with firewall & DDoS protection
- Manually set up SSL certificates
Cloudflare Tunnel solves this problem by flipping the connection:
✅ Your server initiates the connection to Cloudflare
✅ No need for open firewall ports
✅ Free HTTPS via Cloudflare’s network
✅ DDoS protection and access control
In this article, we’ll walk through how to:
- Set up Nginx locally
- Use Cloudflare Tunnel’s easy install script
- Explore manual
config.ymlconfiguration - Understand how Cloudflare Tunnel works
1. Setting Up a Local Nginx Server
Before exposing anything, we need a web server. If you don’t already have Nginx installed, install it:
sudo apt update && sudo apt install nginx -yStart and enable the service:
sudo systemctl start nginx
sudo systemctl enable nginx
By default, Nginx serves a test page on port 80. You can verify by running:
curl -I http://localhostOr, open your browser and visit:
http://localhostNow let’s securely expose this Nginx instance using Cloudflare Tunnel.
2. Installing Cloudflare Tunnel (Easy Script Method)
Cloudflare offers a one-command install that sets up the tunnel without requiring manual configuration:
Step 1: Create a Tunnel in Cloudflare Dashboard
- Go to Cloudflare Zero Trust
- Navigate to Zero Trust > Networks > Tunnels
- Click Create a Tunnel and name it (e.g.,
my-nginx-tunnel)

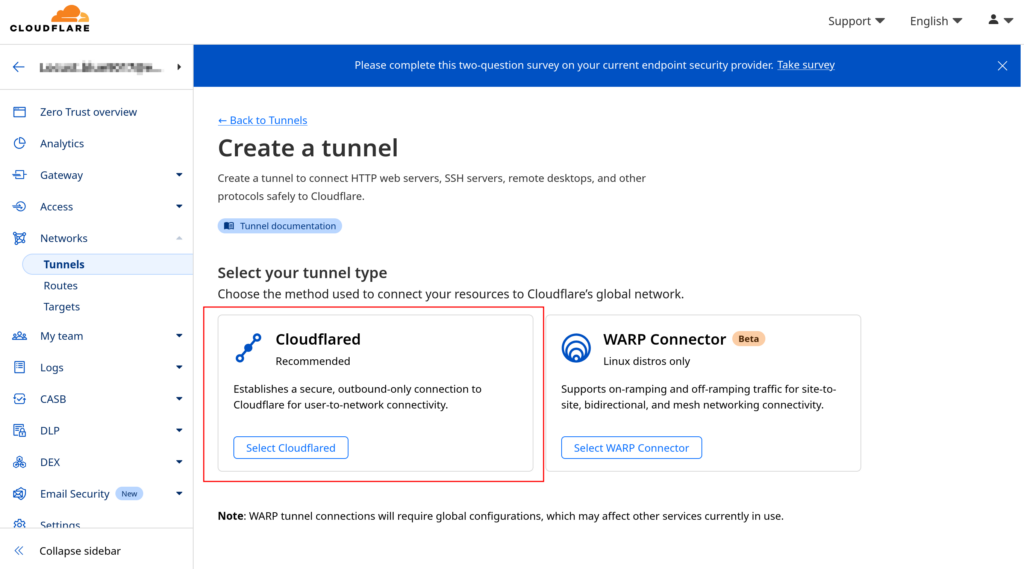
- Name your tunnel
- Select Debian/Ubuntu as the environment
- Copy the provided installation command, which looks like this:
curl -L --output cloudflared.deb https://github.com/cloudflare/cloudflared/releases/latest/download/cloudflared-linux-amd64.deb && \
sudo dpkg -i cloudflared.deb && \
sudo cloudflared service install <your-tunnel-token>- Run this command on your server.
Step 2: Add a Public Hostname
- In the Cloudflare Tunnel dashboard, under Public Hostnames, click Add a hostname.
- Enter your subdomain (e.g.,
nginx.mydomain.com). - For Service Type, choose HTTP.
- Set the URL as
http://localhost:80(this tells Cloudflare to route traffic to Nginx). - Save and restart the tunnel.
✅ Your Nginx server is now accessible at https://nginx.mydomain.com.
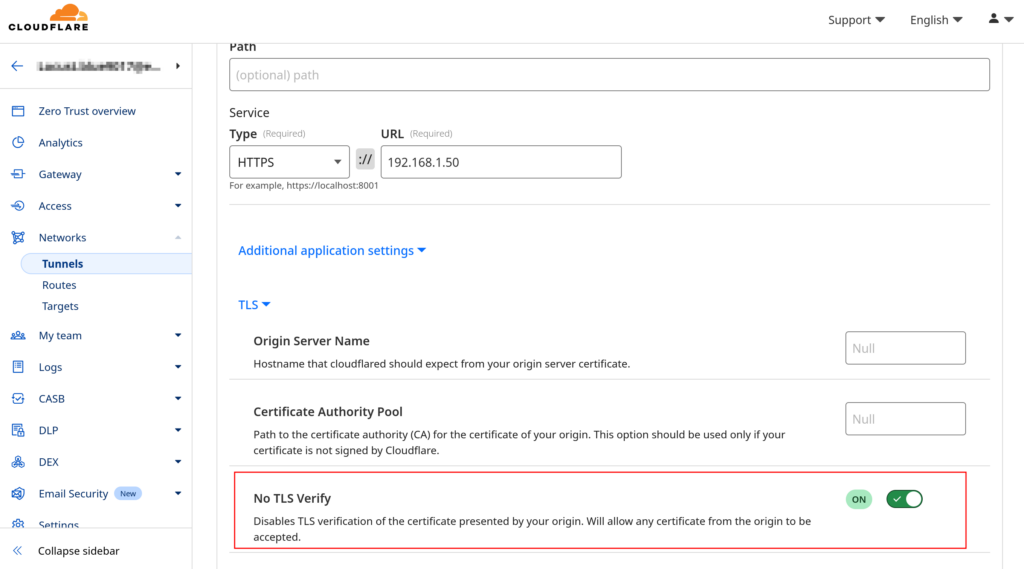
Optional: Choose Service Type HTTPS
- If choosing HTTPS and receiving 301 redirects disable TLS verification.
- Will allow any certificate from the origin to be accepted.
3. Using config.yml for More Control
The easy script installation does not create a config file. If you want manual control over settings, create one:
Step 1: Find Your Tunnel ID
cloudflared tunnel listThis will output something like:
Tunnel ID                            Name
a73b68489d2ff389d2ec7c6eab1aa2fe     my-nginx-tunnel
Step 2: Create a Config File
- Create the config directory:
sudo mkdir -p /etc/cloudflared- Open a new config file:
sudo nano /etc/cloudflared/config.yml- Add the following:
tunnel: a73b68489d2ff389d2ec7c6eab1aa2fe
credentials-file: /root/.cloudflared/a73b68489d2ff389d2ec7c6eab1aa2fe.json

ingress:
  - hostname: nginx.mydomain.com
    service: http://localhost:80
- service: http_status:404- Restart the tunnel:
sudo systemctl restart cloudflaredThis method allows you to easily add more services under different subdomains.
4. How Cloudflare Tunnel Works
Instead of exposing your local web server to the internet, Cloudflare Tunnel inverts the connection:
🔄 Request Flow
1️⃣ User visits https://nginx.mydomain.com
2️⃣ Cloudflare resolves DNS to *.cfargotunnel.com
3️⃣ Cloudflare forwards the request through its network
4️⃣ Your cloudflared client pulls the request via an outbound HTTPS connection
5️⃣ The request is delivered securely to Nginx
💡 Key advantage: Your server is never directly exposed to the internet.
🔍 How It Works
1️⃣ Client (Browser, API, User)
- Requests access to
https://nginx.mydomain.com
2️⃣ Cloudflare Edge (DNS + WAF + Proxy)
- Resolves the domain
- Routes traffic through Cloudflare’s network
3️⃣ Cloudflare Access (Zero Trust Authentication)
- Checks if the user is authenticated (Google, GitHub, etc.)
- If not authenticated, redirects to login
- If authenticated, grants access and forwards traffic
4️⃣ Cloudflare Tunnel (cloudflared)
- Runs inside your private network
- Maintains a secure outbound connection to Cloudflare
- Pulls requests from Cloudflare and sends them to your server
5️⃣ Your Internal Server (Nginx, API, App)
- Receives requests only from Cloudflare
- Stays hidden from the public internet (no open ports!)
5. Security Benefits & Risks
Why This is Secure
✔ No exposed IPs or open ports
✔ Cloudflare WAF protects against attacks
✔ Authentication ensures only authorized users access the service
✔ Logs & monitoring available via Cloudflare Dashboard
✅ Security Benefits
- No open ports → No need for port forwarding
- DDoS protection → Cloudflare shields your server
- Automatic HTTPS → No need to manually install certificates
- Access Control → You can restrict access via Cloudflare Access
⚠️ Potential Risks
- Cloudflare dependency → If Cloudflare has downtime, your tunnel won’t work
- Man-in-the-middle risk → If
noTLSVerifyis enabled, an attacker could hijack traffic inside the tunnel - Rate limits → Free Cloudflare accounts have API rate limits
🛡️ How to Mitigate Risks
✅ Use Cloudflare Access → Require login before accessing services
✅ Avoid noTLSVerify when possible
✅ Monitor tunnel status → Run:
cloudflared tunnel listConclusion
Cloudflare Tunnel makes it extremely easy to expose a local Nginx server securely, without opening firewall ports or exposing an IP.
🔹 The easy script installation works out of the box
🔹 Using a config file gives more control
🔹 Cloudflare handles DDoS protection, HTTPS, and security
1️⃣ How Cloudflare Access Works
Instead of just letting anyone hit your tunnel-protected server, Cloudflare Access acts like a secure login gateway:
🔄 Request Flow with Cloudflare Access
1️⃣ User visits https://nginx.mydomain.com
2️⃣ Cloudflare intercepts the request and checks if the user is authenticated
3️⃣ If NOT authenticated, they are redirected to a login page
4️⃣ User logs in via Google, GitHub, Microsoft, or custom SSO
5️⃣ Cloudflare verifies identity & applies rules (e.g., allow only yourcompany.com emails)
6️⃣ If allowed, Cloudflare forwards the request through the tunnel
7️⃣ User reaches the internal web service 🎉
2️⃣ Setting Up Cloudflare Access
Step 1: Enable Cloudflare Access for Your Tunnel
- Go to Cloudflare Zero Trust Dashboard
- Navigate to Access > Applications
- Click Create an Application
- Choose Self-hosted
- Application Name → (e.g.,
My Internal Nginx) - Application Domain → Enter your hostname (
nginx.mydomain.com)
Step 2: Configure Authentication Rules
Now, define who is allowed to access your service.
- Under “Policies”, click “Create a policy”
- Policy Name: (e.g.,
Allow Employees) - Action:
Allow - Include: Choose authentication methods:
- ✅ Google Workspace (
@yourcompany.comemails only) - ✅ GitHub (Restrict to specific orgs)
- ✅ One-time PIN (for flexible access)
- ✅ IP Ranges (Allow office VPN only)
- ✅ Google Workspace (
- Click Save Policy
Step 3: Apply Access Protection to Your Cloudflare Tunnel
- Go to Zero Trust > Access > Tunnels
- Click your tunnel (
my-nginx-tunnel) - Click Public Hostname (e.g.,
nginx.mydomain.com) - Enable Cloudflare Access
- Select the Access Policy you created earlier
- Save changes ✅
3️⃣ Testing Cloudflare Access
Now, try visiting your secured service:
https://nginx.mydomain.com1️⃣ If you’re not logged in, you’ll see Cloudflare’s login page
2️⃣ Enter credentials (Google, GitHub, or other configured SSO)
3️⃣ If allowed, you’ll be redirected to the internal service
4️⃣ If denied, Cloudflare blocks the request
4️⃣ Bonus: Enforcing Authentication for API Requests
By default, API requests will also be blocked if they don’t pass Cloudflare Access authentication.
For API access, you have two options:
🔹 Option 1: Use API Tokens
- Generate an API Service Token in Cloudflare Zero Trust > Access > Service Auth
- Use the token in API requests:
curl -H "CF-Access-Client-Id: <your-client-id>" \
     -H "CF-Access-Client-Secret: <your-client-secret>" \
     https://nginx.mydomain.com/api/data
🔹 Option 2: Whitelist API Clients
- In Cloudflare Access, allow certain IPs (e.g., VPN users, corporate network)
- Or bypass authentication for specific API routes
✅ Final Thoughts
With Cloudflare Access, you now have:
✔ A Zero Trust authentication layer for your internal apps
✔ No open firewall ports but still secure remote access
✔ Fine-grained control over who can access what
✔ Logs & visibility into all access requests